Web Page: Machine Design Procedure
Web Page: Best Free CAD Computer-Aided Design Software
Web Page: 10 Animals That Use Tools
Web Page: Machine Definition
Does it clearly solve the problem or meet the need? Is it easy and safe to use? If it is a Rube Goldberg machine, is it fanciful and fun?
Remove any troublesome or unnecessary parts.
Rearrange parts that may be out of place.Redo parts that don’t work effectively.
Add any features or parts that will improve the function.
Smooth any rough edges.
Cover any moving parts to protect them, the user, and so on.
Paint parts both to preserve the materials and to make the device more appealing to users. Consider naming the tool or machine and painting that on as well.
A tool is a held item that helps perform a physical operation. (Humans are not the only tool-using creatures. Many animals use tools, as well.) A student designed the tool below to lever up windows that stick.
The curved end fits under the handle or into the handle slot. Once the window begins to open, the end fits under the window itself.
The rubber padding protects the window frame and ledge from pressure marks.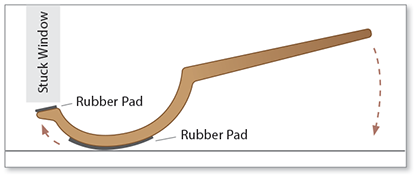
A machine is a more complex tool, consisting of multiple moving parts. A student designed this machine to open the Venetian window blinds without getting out of bed.
1. A dry cell battery supplies the power.
2. A two-pole knife switch turns the power on, off, or reverse.
3. The electric motor from a toy car converts that stored energy to mechanical energy.
4. A wheel from the toy car, large rubber band, and large paper spool convert the motor’s high-speed revolutions to a lower rate.
5. The rod to the window blinds is affixed to the center of the spool.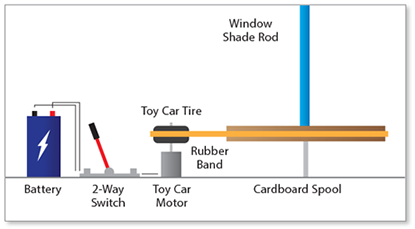
With the knife switch flipped one way, the device turns the rod counterclockwise and opens the blinds. With the knife switch flipped the other way, the device turns the rod clockwise and closes the blinds.
The following photos show Rube Goldberg machines entered into various competitions. Note the diverse use of materials, each capturing potential energy and releasing it as kinetic energy. Also note the themes of the machines. The drawing below comes from Arnold Zucker’s burglar alarm patent.
A These Rube Goldberg machines were built by high school students for competitions.
B This elaborate burglar alarm showered the sleeper awake.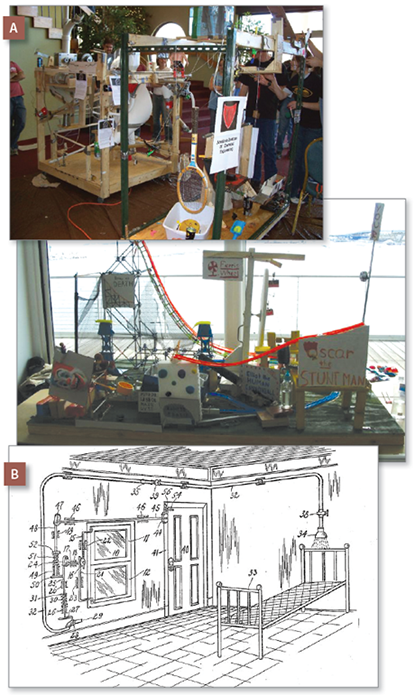
Web Page: Machine Design Procedure
Web Page: Best Free CAD Computer-Aided Design Software
Web Page: 10 Animals That Use Tools
Web Page: Machine Definition